Saturday, February 26, 2011

King Arthur Bacon-Cheddar-Scallion Scones


Dan loves breakfast/brunch, so I have been trying to plan ahead in order to have stuff on hand for the weekend for him; he usually only has coffee for breakfast during the week.

He is a bit of a traditionalist when it comes to this sort of thing; he likes eggs and bacon, pancakes, waffles, french toast, biscuits with sausage gravy and breakfast tacos. He likes them the way he likes them and he doesn't want you messing with them (i.e. I suggested a stuffed french toast last weekend...this was a no deal for the Daniel...he likes things traditional and plain!)

Anyhow, while at Fleisher's I saw some great bacon in the case, and one of my favorite breakfast items from Buzz Bakery in DC was a bacon-scallion scone. Thus, I thought of my meat and potatoes man and fingers crossed hoped that this might be a winner for him.

I browned my bacon in the oven on a jelly roll pan because I hate babysitting bacon. Dan likes bacon extra crispy so I let it get dark but not burned--400F for 17-20 minutes usually does the trick--let it cool and then crumble.

I have a great cream scone recipe that I make with currants (which even Dan likes), but I wasn't sure about proportions for a savory version; therefore, I turned to King Arthur Flour for help.


I baked these up before Dan & I headed out for Long Island (post about that to come later); I let them get a bit darker than I wanted (on accident), but they were still light, fluffy and delicious.

More importantly, they were a HUGE hit with Dan (much to my relief!) As a bonus I have six more of these babies in the freezer to bust out for a quick breakfast later in the month.

King Arthur Bacon-Cheddar-Scallion Scones

Ingredients

--2 cups (8 1/2 oz) AP Flour
--1 tsp. salt
--1 Tblsp. baking powder
--2 tsp. sugar
--4 Tblsps (1/2 stick, 2 oz) cold butter
--1 cup (4 oz) very coarsely grated cheddar cheese
--1/3 cup (about 1/2 ounce) finely diced scallion tops
--1/2 pound bacon, cooked, cooled, and crumbled (roughly 1 cup)
--3/4 cup + 2 Tblsps. (7 ounces) heavy cream

1. Preheat the oven to 425°F. Line it with parchment.

2. Whisk together the flour, salt, baking powder, and sugar.

3. Cut the butter into the flour with a pastry blender until you have pea size bits of butter throughout.

4. Mix in the cheese, chives, and bacon till evenly distributed.

5. Add ¾ cup of the cream, stirring to combine; fingers work well here! You want the dough to be just combined but still scraggly looking.

6. Pat the dough into an 8" cake pan lined with saran wrap; flip the disk out onto your work surface.

7. Use a knife or bench knife to cut the disk into 8 wedges, spreading the wedges apart on the pan (like you would do for cookies).

8. Brush the scones with a bit of cream; this will help their crust brown much like an egg wash would.

9. Bake the scones for 22 to 24 minutes, until they’re golden brown. Remove them from the oven, and cool on the pan. Serve warm, or at room temperature.

Note: As you can see from the photos, I made these with the intention of freezing them, because with there just being two of us, I have no need for 8 scones at one time. I used a glass cake pan, lined it with saran wrap and gently pressed my scones into the pan. From there, I cut the disk into 8 portions with a bench scraper, individually wrapped them tightly in saran wrap, put all in a gallon size freezer bag and popped them in the freezer. I keep a thin sharpie in my kitchen to write the date prepared on the bag as well as baking instruction for ease later on. You'll bake these straight from the freezer at 425 F for 35-40 minutes.


*Those of you who know me well know that I love caramel. Ever since I learned how to make a good caramel sauce I have had a batch in my fridge. The stuff keeps for a month!

Anyhow, in college, my sweet indulgence from the cafeteria was as follows: vanilla frozen yogurt with a sliced banana, dry roasted peanuts and caramel. They didn't have homemade caramel at my university cafeteria, but it was still tasty. I'll post a caramel recipe the next time a make a batch; I just wanted to share my delicious (and mildly nutritious) afternoon snack with you guys...yum!

Thursday, February 24, 2011

DEER!

So, I have to give Remi some credit. I was testing vanilla wafers in the kitchen this afternoon and he started barking his little head off. I looked outside to see what the commotion was about and I didn't see anything so I went back to the kitchen. Remi continued to bark and the fur on the back of his neck was standing straight up, so I looked again.

Much to my surprise, Remi was not just barking at the wind, there were at least eight deer in our side yard...eight (potentially nine; I thought I saw another routing around but I only officially photographed eight!)


The photos are sort of the "Where's Waldo" picture for deer; I had the macro lense on my camera and didn't have a chance to switch the lense for a telephoto before they darted off. I attempted to make arrows in paint...enjoy!

Monday, February 21, 2011

Groovy Gravy and PEEPS


We woke up to 4 inches of new snow on the ground; my initial reaction to this announcement from Dan was mild. I was still half asleep and 4 inches seemed nominal in my woosy state.

When my alarm went off and I peeled myself out of the nice warm bed and peeked out onto the deck I found that a 4 inch layer of snow waiting for me to shovel was more than I had initially expected...ugh.


Dan usually shovels, but on days that we don't expect snow he doesn't get up early enough to complete this task, clear off his car, and still make it to work on time. I really don't mind; snow removal has become quite a nice workout for me during these winter months. I'll have some serious guns if we continue to have regular snowfall.

Later, when I went to clear Walter off for my market run I found that I had been peeped...yes...peeped!

In college my good friend and later roomie told me about a game they used to play in high school. Basically, whenever the peep chicks hit the market...game on. In college we divided up into teams guys vs. girls. The idea being to "peep" the other team members (or their stuff) with marshmallow chicks without being caught.


You can accomplish this in a number of ways. The car (as seen in these 4 photos) is a great target, because you can easily peep the person with little risk of being caught if you know the person's general schedule. The top of the antenea is a fun spot, though I have seen them under door handles, stuck to windows, in tail pipes etc.

This having been said, I would not recommend this game for an immature crowd; the idea is good clean fun, not intentional property damage or malicious harm in any way. We have a good group of friends so it wasn't a big concern, and you always knew to do a full walk around vehicle check during peep week so you wouldn't end up with a melted peep mess.

Serious players will keep count of the peeps. If we were playing this way I would have to tally 10 against me. After a specified amount of time (typically 8 days...which includes 2 weekends) you tally all of your strikes and whichever team has less wins.


It may sound dumb to most people, but we really had a blast with it. You would be amazed at some of the crazy creative things folks came up with over the years. For example, junior year, some guy friends scaled our balcony (we were on the second floor), climbed through our kitchen window (which they cleverly unlocked earlier that week) and pretty much peeped our entire apartment. There were literally peeps in every cabinet, every drawer...you get the idea...we found peeps for months!

Senior year, Dan and his friends built a "peep-a-pult" out of pvc pipe. He wired it to our apartment door handle so that when we opened the front door peeps would be launched at us (therefore contributing to our tally.)

Anyhow, Dan got me today; it was a sweet reminder of fun times in college...man I love that guy...he knows how to melt my dorky little heart!


So...food...now that I have the time to make a real dinner, I often find it difficult figuring out what to make. Dan may seem easy to please but he is my harshest critic as well as my biggest supporter. Trying to keep things simple for him, I have been thinking back to what my mom used to make, which brings me to groovy gravy.

When I was in the fifth grade, my grandma unearthed a recipe that my mom had found in a magazine in the 1970's (title makes sense now right.) Mom gave it a whirl, and according to my diary (I've kept one since 2nd grade) it was "totally rad". Keep in mind, fifth grade was also the year that my friends and I sang "A Hard Day's Night" for the talent show at church; this might have had an affect on my love for this dish.


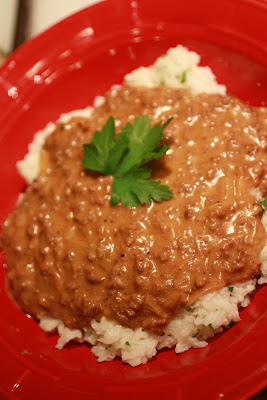
The presentation here is not the best, and maybe it needs more tweaking still but it has good flavor. It is one of those recipes that you can add a little of this or a little of that until it meets your taste. I am my father's daughter in this respect; the original recipe consisted of the first 3 ingredients listed served over rice. I added a bit of this and a bit of that (things I had in my fridge or pantry) until it had more depth of flavor. I would not doubt that dad probably tweaked this when I was a kid; maybe this is why I remember it being good!

Groovy Gravy
--1 pd ground beef
--1 can Campbell's golden mushroom soup
--1/2 cup Lipton onion soup mix
--1 medium onion
, finely diced
--1/2 cup cream cheese
--1/4 cup grated parmesan
--1/2 cup 2% milk
--1/2 cup beef/chicken stock or water
--2 Tbsps worchestershire sauce
--2 Tbsps blackstrap molasses
--1 Tbsp. red wine vinegar
--1/4 tsp. red pepper flake
(or to taste)
--1/4 tsp. cayenne pepper (or to taste)
--salt and pepper

1. Finely dice the onion (I used yellow because I had that on hand). Season the beef with salt, pepper, cayenne and red pepper flakes; Get your hands dirty and work the spices into the meat. Brown the beef and onion in a pan with a bit of olive oil.

2. Add mushroom soup and sprinkle on the onion soup mix. Stir; slowly add in the milk. Add cream cheese by tablespoons--thin out with stock as needed (mine was a bit thick without the stock).

3. Add the molasses, worchestershire and red wine vinegar. Taste; season with more fresh cracked pepper, salt, cayenne.

4. Serve over white rice. Note: I added butter and parsley to my rice after cooking for more flavor; it is a blank slate to do with as you please.

Sunday, February 20, 2011

Gardening and Apple Sauce


It has been a nice slow, cold Sunday evening in our household. We went on a long walk, made some chicken salad for sandwiches tomorrow (and chicken stock consequently), apple sauce and we've been watching Star Wars, because who can resist a Star Wars marathon! Anyhow, Dan thought it was customary to make Remi into a Jedi....


this is Remi the Jedi Knight's contemplative look...


Earlier in the day I had my first gardening class at The Phantom Gardener. If you missed my previous post about such (for shame) I've decided to take classes at a local gardening center to learn how to build and keep an organic vegetable garden this season.

My parents had a small garden when I was in elementary school, but since I was never responsible for its development, I have no clue how to start. Also, my parent's aren't into organic gardening yet; they are on some level, but for what I ultimately want to do I needed more expert advice.


This first class discussed soil; how to compost, soil PH, seeding, the works on how to get started. The instructor (who is the owner of the garden center) also gave us many resources to use for independent study.

I found several books of interest from the stack of recommended reading; the ones that interested me most were those on how to build and establish a good compost pile. I'll let you know if I find any helpful (or easy to understand for a novice!) I am rather curious about the concept of compost and all of the benefits of keeping such, both for a garden and for the overall environment. It seems like such an easy concept--use the materials God has given us to create new materials.


I cannot start a good pile until probably summer when materials are more readily available, so as far as the rest of the day. When Dan was growing up his mom's two main side dishes were garlic egg noodles (egg noodles with minced garlic, carrots, scallion and olive oil), and apple sauce.

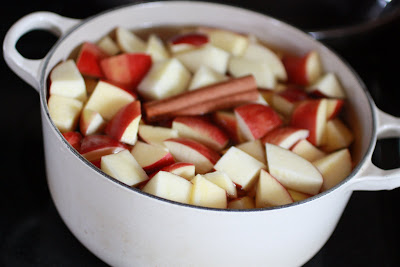
I've been on a "make it from scratch" kick. Apple sauce is one of those things that is super easy to make so I figured why not when Dan asked for apple sauce with dinner. In our area, many of the local farmers still have apples in cold storage from their prime (and as an added bonus, making this makes your house smell delicious!)


Aunt Peggy's Apple Sauce (slightly adapted)

--8(ish) apples (roughly 3 pounds); I use a mix of what I have on hand
--1 cup water or apple juice
--1/2 sugar (this is to taste depending on the sweetness of your apples)
--1 cinnamon stick
--dash of cinnamon


1. Cube apples; if you plan on using a food mill or ricer there is no need to peel the apples (though red ones will tint your liquid a bit pink.) Bring apples and cinnamon stick to boil in water or apple juice and simmer for 30 minutes or until tender.

2. Put apples through a food mill or ricer (the ricer will give the sauce a chunkier texture.) Add sugar and cinnamon to taste (you can add some lemon zest or a squirt of lemon/orange juice, a dash of allspice...get creative!) Serve warm/room temp or chill in the fridge.

Note: I boil in apple juice when I have it on hand and then I keep the liquid and use it for warm apple cider. The sauce will keep in the fridge 5-7 days (if it lasts that long) or properly can in a water bath if you wish to keep longer.

Saturday, February 19, 2011

Local Treat Indulgences


Okay, so a few new indulgences of mine are as follows: croissants & macarons (the ones with one o...not the coconut kind.) These are not new items in the world, just somewhat new to me. I never really appreciated either growing up because I had never had good versions of either.

I have learned that the Apple Pie Bakery Cafe turns out pretty fantastic versions of both and I am all too happy to pop in for a latte and croissant and settle in with a good book; I cannot resist taking a macaroon or two to go. The salted caramel one is my favorite!


Another indulgence...cheese.....


In New Paltz, there is this delightful little cheese shop/chocolate shop called The Cheese Plate; located in Water Street Market, a fabulous area that I must explore more. I went on advise from a mentor and purchased a chunk of Gruyere and several truffles. Kat, the gal running the shop when I stopped by, is absolutely fabulous and very knowledgeable.


I ate all of these over the week...by myself...Dan failed to give me chocolate for Valentine's Day and besides, he had his own chocolate!

Monday, February 14, 2011

My Funny Valentine

Valentine's Tradition #1: Box of Chocolates

On Valentine's my sister and I would wait excitedly for dad to come home from work because we knew that in tow were three very special boxes of chocolates; one for each of us and a huge one for mom!


Dan hasn't caught on to this tradition yet...for shame! However, knowing that he usually forgets the chocolate, I thought I would sneak a box in his bag Valentine's morning for a surprise when he got to the office to start his day. I decided to go with the good stuff: Jacques Torres dark chocolate. Needless to say, this went over well, and he even shared the chocolate with me :)


Tradition #2: Aunt B's tree.


Okay, so my Aunt B has a quaint old house with lots of character; over the years, she has collected all sorts of fabulous little crafts and what nots and she decorates almost every room according to season. There is something that is just homey about it. My mom decorates for Easter, Halloween, Thanksgiving and Christmas; Aunt B decorates almost year round. There is always something to look forward to when you go to her house!

One thing that always fascinated me, as a child and today, is a small artifical tree set up in her sunroom. She keeps the tree up year round and decorates it according to the appropriate holiday. I love this tree (seriously, when I go to her house I beeline it to the tree to see what she's added and then I meander through the house to see if I spot any other new finds!)


When I was in high school I asked my mom for an extra small version of Aunt B's tree for my room. My tree is a quarter of the size of Aunt B's, but it turned out to work out perfect because it fit in my dorm for college and now in my apartment.

We had to down size when we moved from DC, so I didn't bring any of my holiday decorations for the house. It may seem silly, but I really look forward to decorating the house for the different holidays; I was a bit bummed not have all of my stuff. However, I kept one box with a few different items for my tree for each season; above is my Valentine's tree with 100 wishes garland. I'll post a few snapshots when I change it for St. Patty's day coming up.


For Valentine's as promised, I made Jam Sandwich cookies. I used a recipe from Cook's Illustrated. They were good but I would like to make real linzer tarts next time, so I'm just posting the images now; I will post a recipe when I have one that tastes like what I know this cookie to be.


Also, this recipe was kind of a pain in the neck to work with; the dough is stiff and has to be refrigerated before rolling out and after rolling out. It isn't impossible; it just isn't easy either.


I sent the lot with Dan to his office and as I suspected, the shortbread cookies received the raves (which goes back to what the pastry chef, Karie, told me in DC...trust the cook books!) I wish I would have just made a double batch of shortbread. They were not only delicious but beyond easy to make.


Tartine Shortbread Cookies
Ingredients:


--1 cup + 2 tbsp (9 oz/255 g) unsalted butter, very soft
--1/2 tsp (2 ml) salt

--1 3/4 cups + 2 tbsp (9 oz/255 g) all-purpose flour

--1/2 cup + 2 tbsp (2 2/3 oz/75 g) cornstarch
--1/3 cup (2 1/2 oz/70 g) granulated sugar

--1/4 cup (2 oz/55 g) superfine sugar for topping


Directions:
1. Preheat oven to 325. Butter a 6-by-io-inch glass baking dish. (I used a half sheet pan because that is what I had on hand similar to those measurements and it worked like a charm.)

2. Place the butter in a mixing bowl. (Elisabeth notes that it is imperative that the butter is very soft, like the consistency of mayonnaise or whipped cream.) Add the salt to the butter and mix well with a wooden spoon or whisk so that it dissolves completely before you add the rest of the ingredients.

3. Whisk the flour and cornstarch together into a bowl. Add the granulated sugar to the butter and mix just until combined. Add the flour mixture and mix just until a smooth dough forms.

4. Pat the dough evenly into the prepared baking dish. The dough should be no more than 2/3 inch deep. You want a nice smooth surface on the top because if it looks lumpy prior to baking, it'll still look lumpy afterwards!

5. Bake until the top and bottom are lightly browned, about 30 minutes. The middle of the shortbread should remain light. Let cool on a wire rack until warm to the touch.

6. Sprinkle the shortbread with the superfine sugar. Tilt the dish so that the sugar fully and evenly coats the surface and then tip out the excess sugar. (If you don't have or cannot find superfine sugar you can put granulated sugar in the food processor and pulse for 20 seconds.)

7. With a very thin, sharp knife, cut the shortbread into rectangular fingers about 1/2 inch wide and 2 inches long. (If the cookies have become cold they will not slice well, so they must still be warm to the touch at this point, otherwise they will crumble on you.) Chill thoroughly before removing from the baking dish.

8. These should come out easily with a small, thin offset spatula; I received a tiny pampered chef one from my friend Kate that I engaged here. The cookies will keep in an airtight container in a cool place for up to 2 weeks (though in my house there was no way they'd last that long!)

Sunday, February 13, 2011

Lazy Week

For those of you who follow this little blog weekly I apologize for being lazy! Quite honestly, I have made several things (fried chicken, peanut butter caramel brownies, chocolate chip cookies, etc.) but I was not satisfied with the ultimate outcome of any of the recipes enough to actually post about them. They were all promising, but in the end they missed the mark for me.

I will attempt to do better this week! Today, though still rather sluggish, after hitting the farmers market I made both a traditional shortbread as well as jam sandwich cookies; both turned out lovely. I will photograph them in the morning and post the recipes soon afterwards.

In the mean time, for those of you food loving folk who have yet to read Michael Pollan's Omnivore's Dilemma, this should be close to the top of your list. For culinary school we were sent a list of recommended reading; yes, similar to what you would receive before departing for summer break in middle school. Thus, being a goody two shoes type of student, I have been systematically reading my way through the lengthy list. Some of course are better, or more relevant to me, than others.

I started with the Omnivore's Dilemma, because the bakery manager at the shop in DC which I interned, recommended it to me a few weeks before I received the "recommended" list of reading materials. Michael delves into the world of food as we know it and how it has become mostly unidentifiable in the last 50 or so years. It is a fascinating and mildly disturbing piece of work that will make you reevaluate what and how you eat (if you have not already come to terms with this notion).

In this line of thinking I will begin my intro to gardening course next weekend. I am taking classes from a local shop that teaches novice gardeners how to set up and establish their own vegetable gardens using organic and sustainable principles. Now that we have a huge piece of land, I can finally have a nice vegetable garden; all I need is the know how at this point!

Monday, February 7, 2011


For Super Bowl Sunday Dan, Remi and I were rather lazy (and unsocial to boot.) Growing up, we would gather with several other families at one home starting at around 4pm or 5pm; the parents would have cocktails and the kids would play.

We haven't made friends yet, so we just made a day of it on our own. We had 2 rounds of snacks; chips and dip during the Caps hockey game in the afternoon and deviled eggs once the Super Bowl pregame started.


I decided to make mini sloppy joes and mashed potatoes for a "main course" of sorts. I had seen an article in the NY Times years ago (09) breaking down what makes a good burger and they had a recipe for brioche buns.


I used their recipe and just rolled my buns smaller so I ended up with 16 slider size buns vs. 8 hamburger size buns; I separated them onto two trays for more even baking.


If you recall, we live in an icebox currently so it took two full hours for the first rise and another hour and half for the second rise. In a normal environment it would likely take an hour.


I really liked these on the whole and will definitely be engaging these this summer when we can get the grill going again
.


I put a McClure's pickle on the side because they have great flavor and crunch, and Dan and I just like pickles. Honestly, I prefer a sweet gherkin to a dill (surprise) but Dan likes the dill; these are the best dill in my book.


Light Brioche Buns:

First Published: June 30, 2009 in the NY Times
(Adapted from Hidefumi Kubota, Comme Ça, Los Angeles)

Ingredients:

--3 tablespoons warm milk
--2 teaspoons active dry yeast
--2 1/2 tablespoons sugar
--2 large eggs
--3 cups bread flour
--1/3 cup all-purpose flour
--1 1/2 teaspoons salt
--2 1/2 tablespoons unsalted butter, softened

1. In a glass measuring cup, combine 1 cup warm water, the milk, yeast and sugar. Let stand until foamy, about 5 minutes. Meanwhile, beat 1 egg.

2. In a large bowl, whisk flours with salt. Add butter, smudging between your fingers with the flour to make crumbs. Using a dough scraper (a curved piece of plastic or silicone; you can find it here...this is different from a bench scraper), stir in yeast mixture and beaten egg until the dough forms. Scrape dough onto clean, unfloured counter and knead, scooping dough up, thwacking it on the counter and turning it, until smooth and elastic, 8 to 10 minutes.

3. Shape dough into a ball and return it to a lightly oiled bowl. Cover bowl with plastic wrap and let rise in a warm place until doubled in size, roughly 1 to 2 hours. (I roll the dough around in the bowl with the oil to prevent the dough from forming a skin).

4. Line a baking sheet with parchment paper. Using a bench scraper, divide dough into 8 equal parts (I did this and then divided those in half)
. Gently roll each into a ball and arrange them 2 to 3 inches apart on the baking sheet. Cover loosely with a clean kitchen towel and let buns rise in a warm place for 1 to 2 hours. I had to put mine by the radiator because it was so cold in the house.

5. Set a large shallow pan of water on oven floor (or on the bottom rack if you have an electric oven). Preheat oven to 400 degrees with rack in center. Beat remaining egg with 1 tablespoon water and brush some on top of buns (sprinkle sesame seeds now if using). Bake, turning sheet halfway through baking, until tops are golden brown, about 15 minutes. Transfer to a rack to cool completely.


**I schmeared a little cinnamon toast butter on two and microwaved them for 30 seconds for breakfast...yum! (Cinnamon toast butter is exactly what it sounds like; butter blended with lots of cinnamon and sugar. You can make your own, or if in the Hudson Valley, Ronnybrook Farm makes it already mixed; I purchased mine at Fleisher's.)

Thursday, February 3, 2011

Tartine Lemon Bars on Brown Butter Shortbread


One of the pastry chef's that I worked with in DC gave me the advice to use recipes from good cook books and not the Internet because a good cook book won't let you down.

This sent me to the library to do a bit of research, and I found this gorgeous book called Tartine which is named for Tartine Bakery & Cafe in San Francisco. The beautiful photos alone draw you in, but after reading it cover to cover, I daydream about doing my CIA externship at Tartine....a girl can dream!

I still find and use recipes on the Internet but I am attempting to cook through my stacks of cookbooks and keep the ones that I love and donate the ones I do not.


We have been having seriously cold weather recently; it was -2 last night! Being from the South we have not fully figured out our radiators so it is either boiling hot in our house or freezing cold.

Currently we're in a freezing spell; yesterday I woke up and put on long johns, sweats and a puffer vest in order to make coffee! You know it's bad when while making coffee I glance over and see Remi shivering on his bed. So, I plugged in the heating pad, grabbed the little fuzz butt and curled up on the couch to go through some cook books and warm up.


Anyhow, this cold weather has my mind wandering to the tropics and after having a delicious lemon meringue tart from Bread Alone last week (photo posted at the end of my 1/26 entry) and then seeing these yummy lemon bars in Tartine, a baking project emerged.

The recipe uses a brown butter shortbread which requires you to blind bake the dough while making the filling. I do not own pie weights and I did not have any dry beans on hand so I remembered reading from Rose Levy Beranbaum that copper pennies did a good job. Ones from 1982 or older are best because they are 95% copper, anything older is mostly zinc and only coated in copper. I busted out my penny jar and found lots of old pennies to do the job--even a few from the 1940's--lining my pan with parchment and then foil to hold the pennies.


The key to this recipe is fresh lemons so put in the elbow grease and get to juicing (I am thinking of investing in a simple juicer; Aunt B hooked Dan on fresh squeezed orange juice and it would help in times like these!) I ended up using 6 lemons total to equal one cup of juice.

The final product turned out beautifully. I really enjoy a good lemon bar and I thought that I could convert Dan; these fit the bill for me but Dan is still a key lime boy through and through when it comes to citrus. Mom always used the kind in the box that you find in the supermarket (love you mom!); these are obviously miles better than anything you will find in a box and they are super easy to boot. I took a picture of the bars early this morning and then sent the lot with Dan for his office (otherwise I am liable to eat them all and my hips would not appreciate that!)


Lemon Bars on Brown Butter Shortbread
(Recipe from Tartine Cookbook)


Yield: one 9-by-13-inch baking pan; twelve 3-by-3 1/4-inch bars (I cut them into little 1 x 1 squares so that they would go further; Dan has quite a few folks in his new office. I may start Friday treat days for them to encourage me to step out of my box and try new things.)

For the crust:
--1/2 cup confectioners’ sugar (2 oz/55 g)
--1 1/2 cups all-purpose flour (7 1/2 oz/215 g)
--3/4 cup unsalted butter, at room temperature (6 oz/170 g)


*Elisabeth lists 1/2 cup pine nuts (2 oz/55g) as optional. I chose not to add these in favor of something more traditional.

For the filling:
--1/2 cup all-purpose flour (2 1/2 oz/70 g)
--2 1/4 cups sugar (1 pound/455 g)
--1 cup plus 2 tbsp lemon juice (9 oz/28o ml)
--lemon zest, grated from 1 small lemon
--6 large whole eggs + 1 large egg yolk, plus pinch of salt
--confectioners’ sugar for topping

Directions:
1. Preheat the oven to 350F and butter a 9-by-13-inch baking pan.

To make the crust:
1. Sift the confectioners’ sugar into the bowl of a stand mixer fitted with the paddle attachment. Stir in the flour. Add the butter and pine nuts (if using) and beat on low speed just until a smooth dough forms.

2. Press the dough evenly into the pan and allow it to come up about a 1/2 inch up the sides of the pan. Line the crust with parchment paper and fill with pie weights.

3. Bake the crust until it is a deep golden brown, about 25-35 minutes.

To make the filling:
1. While the crust is baking sift the flour into a mixing bowl and whisk in the sugar until blended. Add the lemon juice and zest and stir to dissolve the sugar.

2. In a separate mixing bowl, whisk the whole eggs and egg yolk with the salt. Add the eggs to the lemon juice mixture and whisk until well mixed.

3. Once the crust is ready pour the filling directly into the pan (leave the pan in the oven while you do this to make it easier). Reduce the oven temperature to 300 degrees F. and bake just until the center of the custard is set, about 30 to 40 minutes.

4. Let cool completely on a wire rock, then cover and chill well before cutting. Cut into squares and dust the top with confectioners’ sugar, if desired. They will keep in an airtight container or well covered in the baking dish in the refrigerator for up to 4 days.
* Bakers measure things by weight (as I learned in the DC bakery); Elisabeth lists the weight amounts so I included those here. My in-laws gave me a lovely little Oxo Food Scale as part of my Christmas gift (they rock!) and I have been trying to use it in place of my usual cups, tsps. etc. It truly makes a difference and I will try and remember to put these measurements on baking recipes I use on this site.

Wednesday, February 2, 2011

Pancakes and Taco Seasoning...i.e. Wacky Wednesday


Dan was able to work from home today due to the wintry mix we were doused with overnight/early morning coating everything in a layer of ice.

I woke up early (Dan has been letting Remi sleep on our bed at night since it's been chilly; he's a great little fuzzy heater...Remi, not Dan...so I haven't complained! However, Remi likes to curl up on your leg and after a while your leg goes numb and I wake up). Anyhow, I decided to make some coffe, take a shower and since there was still some buttermilk in the fridge, what better to make on a snowy morning than pancakes.


Unfortunately, I have never invested into a proper pancake pan. Dad has a great seasoned square cast iron pan that makes the absolute best pancakes and grilled cheeses. I need one of these, or maybe I'll hijack his, but my little hand-me-down non stick pampered chef skillet will have to do for now.

I used a recipe from Martha Stewart (with a tiny little tweak). The key to good pancakes whether making from scratch or using Bisquick (what I grew up with) is to not over mix. Seriously, you want to just blend until combined, you want the lumps.

Martha's Buttermilk Pancakes:

--2 cups AP Flour
--2 tsp. Baking Powder
--1 tsp. Baking Soda
--1/2 tsp. Salt
--3 Tblsps. Sugar
--2 Large Eggs, Beaten
--3 Cups Buttermilk (I ended up using 2 cups buttermilk and 1 cup whole milk because I ran out of Buttermilk; they were still delicious)
--4 Tblsps. Butter, Melted (plus more for pan)

Secret ingredient....1 tsp. GOOD vanilla extract (Dad always adds this to his pancakes).

Directions:

1. Whisk together dry ingredients: flour, baking powder, baking soda, salt, and sugar in a medium bowl. Add eggs, buttermilk, vanilla melted butter; whisk to combine. Again, batter should have small to medium lumps.

2. I used a little ladle my Aunt B gave me to add a bit of butter to my tiny pan and then ladle a bit of batter. (Dan likes the edges to have a bit of crunch.)

3. Cook the pancake until you see bubbles toward the middle of the cake and then flip. The key is to only flip it once before plating to keep the fluff.

4. Plate and top with syrup (or that's how I roll, since it was cooked in butter).


One of my favorite simple meals that my mom made growing up is taco salad; I know ridiculously easy, right, so why write about it? You literally just brown up some ground beef (local, grass-fed of course) add seasoning and then build your salad however you want it. It seems pedestrian but it is gloriously delicious, or at least I think so, and thus I thought I should share!

Mom always used a McCormick's packet of taco seasoning, but we wanted taco salad, and had no such packet in our pantry. The only seasoning packet we keep on hand is Hidden Valley Ranch Dip mix, because I haven't been able to let go yet. Anyhow, we threw together our own "mix" with what we had in the pantry (I had beef in the freezer and we always have tortilla chips and salsa in our house!)


We ended up with a great little meal along with a walk down memory lane.


Seasoning Mix:

--1 Tblsp. Chili Powder
--1/4 tsp. Garlic Powder
--1/4 tsp. Onion Powder
--1/4 tsp. Crushed Red Pepper Flake (add more or some ground cayenne for more heat)
--1/4 tsp. Oregano
--1/2 tsp. Paprika
--1 1/2 tsps. Ground Cumin
--1/4 tsp. Celery Salt
--3/4 tsp. Kosher Salt
--1 tsp. Fresh Ground Pepper


Directions:
1. Blend all seasonings together; sprinkle 1 pound of ground beef with half of the seasoning mixture. This is the point that you get your hands dirty, massage your meat with the seasoning and brown it up with a small onion, diced.

2. I like to sprinkle the remaining seasoning on the meat as it browns, kind of a dump of spices periodically as it cooks. Drain on a plate with paper towel to soak up the excess fat.

3. To assemble the salad a) grab a bowl, b) crush tortilla chips, add to bowl, c) lettuce (whatever you like and looks fresh), d) fresh veggies, whatever you think would be tasty; generally we usually have tomato and onion in the fridge, e) salsa; we like a fresh salsa or restaurant style pico, f) meat, g) cheese, h) dressing; we use Catalina...another thing I buy from the store...mom used this and I haven't been able to replicate it quite yet i) scarf!!